
If you run a website then the General Data Protection Regulations (GDPR) should be on your radar. The rules cover how personal data is collected and controlled by organisations and there is a useful infographic on it's core components here. The rules come from a European privacy directive however they impact businesses around the world as they apply whenever someone from Europe interacts with your business even if you are outside of the EU. The regulations were introduced in 2016 and enforcement begins on May 25th 2018.
In this post we introduce a process for achieving compliance and take a look at the practical implications for people running websites on WordPress. We will also provide some specific steps you can take towards compliance by collecting informed consent from your users, while also anonymising and minimising instances of personal data collection.
Important Notes & Disclaimer: We are not legal advisors and this is simply to show you some of the steps that can be taken on the road to GDPR compliance based on our best understanding at the date of publication. Following the steps in this post alone is not enough to ensure compliance and nothing contained within should be considered legal advice. We strongly recommend you consent with legal professionals and privacy authorities experienced with both GDPR and your local market, which may or may not have stronger protections or differing definitions.
Introducing The AD-MACE Approach to GDPR Compliance

While analysing several websites, business tools, systems, and processes for GDPR compliance, I developed the AD-MACE process for strategically approaching each unit. AD-MACE is a two phase process for reviewing (AD – Auditing Data Practises, Deleting Unnecessary Data Elements) and optimising (MACE – Minimising Data Collection, Anonymising Data Collection, Collecting Consent, Educating Users) organisational data and data privacy processes.
The Data Review Phase
- Audit – The first step to GDPR compliance is understanding exactly what data is being collected and processed by your business and its partners. You need to look at all of the software, processes, and places that touch personal data within your organisation. You also need to take a look at all the data you currently hold and exactly how it was collected, even if you no longer use those methods or systems.
- Delete – Sometimes it is clear when a tool is collecting data but it may not always be immediately be obvious. For example Facebook Like buttons and Widgets don’t directly pass you information in most cases but they still collect data and pass it back to Facebook. Ask yourself whether you really need the information or functionality something provides and if the answer is no, then you can simply remove it so that you no longer collect or control that information. You may also want to review the data you have previously collected and if you no longer need it or you are not sure how it was collected, you might want to consider deleting it.
The Process Optimisation Phase
- Minimise – The first part of the optimisation process is to minimise the amount of data that is collected as much as possible. This is the main focus of this blog post and we will provide examples of how you can strip unnecessary data from contact forms and provide explicit opt-in mechanisms for more aggressive data collection.
- Anonymise – Sometimes you may collect personal information that doesn't actually need to represent a specific individual. A good example of this is general website analytics data. If you only need general trends to understand website usage then there is no point in storing something like an IP address which can be tied to a specific user. Later in this post you will learn how to anonymise Google Analytics data collection.
- Collect Consent – Even the most privacy-centric organisation will often need to hold personal information for the business or website to function effectively. But in cases where the information is not essential, you will need to get explicit consent of the user you are collecting data on. Later in this post we will show how you can activate optional data collection via Google Tag Manager only after a user provides consent.
- Educate – Once you have removed all unnecessary data collection and implemented appropriate controls for future data collection it is time to document your activity once more. This stage differs from the initial audit in that you are classifying your data usage and processes for the future. You should use this information to update your data policies so that they are entirely transparent. Additionally you should be aiming to include notices that educate users about exactly what is happening whenever they interact with a part of your business that collects their data.
You can run the AD-MACE process against; your organisation as a whole, individual websites, specific tools, and more. It is important to consider each stage of the process every time even though not every stage will require an action every time. For example there will likely be some limitations in the data you can actively delete or anonymise in relation to your compliance and fraud protection processes.
****
Throughout the rest of this article you will find examples of how you might action the AD-MACE process for a modern WordPress site. Where specific tools are mentioned they are not necessarily the only or best way of achieving a desired end. Techniques, tools, and goals vary so you may find that you select alternate methods whilst going through the exact same process for your WordPress site.
Audit: Understanding Your Data
The first step to GDPR compliance is understanding what data you are collecting and how it is being processed. To aid this you are encouraged to complete and information asset register. If you’re a smaller business this may not be required by law however it is still a useful step to begin understanding where you are at. For keeping track of this part of the process you might find it useful to use this template from digital analytics provider Matomo.
Performing A Data Audit For WordPress
WordPress Audit
The team behind WordPress are hard at work to ensure GDPR compliance but there are some steps you can take before they make changes. WP GDPR Compliance is a popular plugin that provides checklists and notices about the core components that collect data and how they might be affected by the regulations. It also bundles in some functionality that can help you to educate users and collect consent for these features.
Plugin Audit
Whilst no two sites are the same there are a few things that you can do which should identify the majority of data collecting processes on your websites. The first and most obvious place to get started is a simple plugin check. Head on over to your plugins page and consider whether each plugin is likely to collect any user data. Data collection could include anything which can be used to personally identify an individual such as:
- IP Addresses
- Personal Contact Information
- User actions on the website
- Demographic Information
Cookie Audit
Once you have completed this process for all of your plugins you can complete a cookie audit. There are various tools for this available online, but if you use Google Chrome then there is a useful extension called Edit This Cookie. If you install this and visit your site then you can get a list of all cookies that are loaded when you visit a specific page. As a side note it can also be used when testing your consent solutions to confirm they actually work.
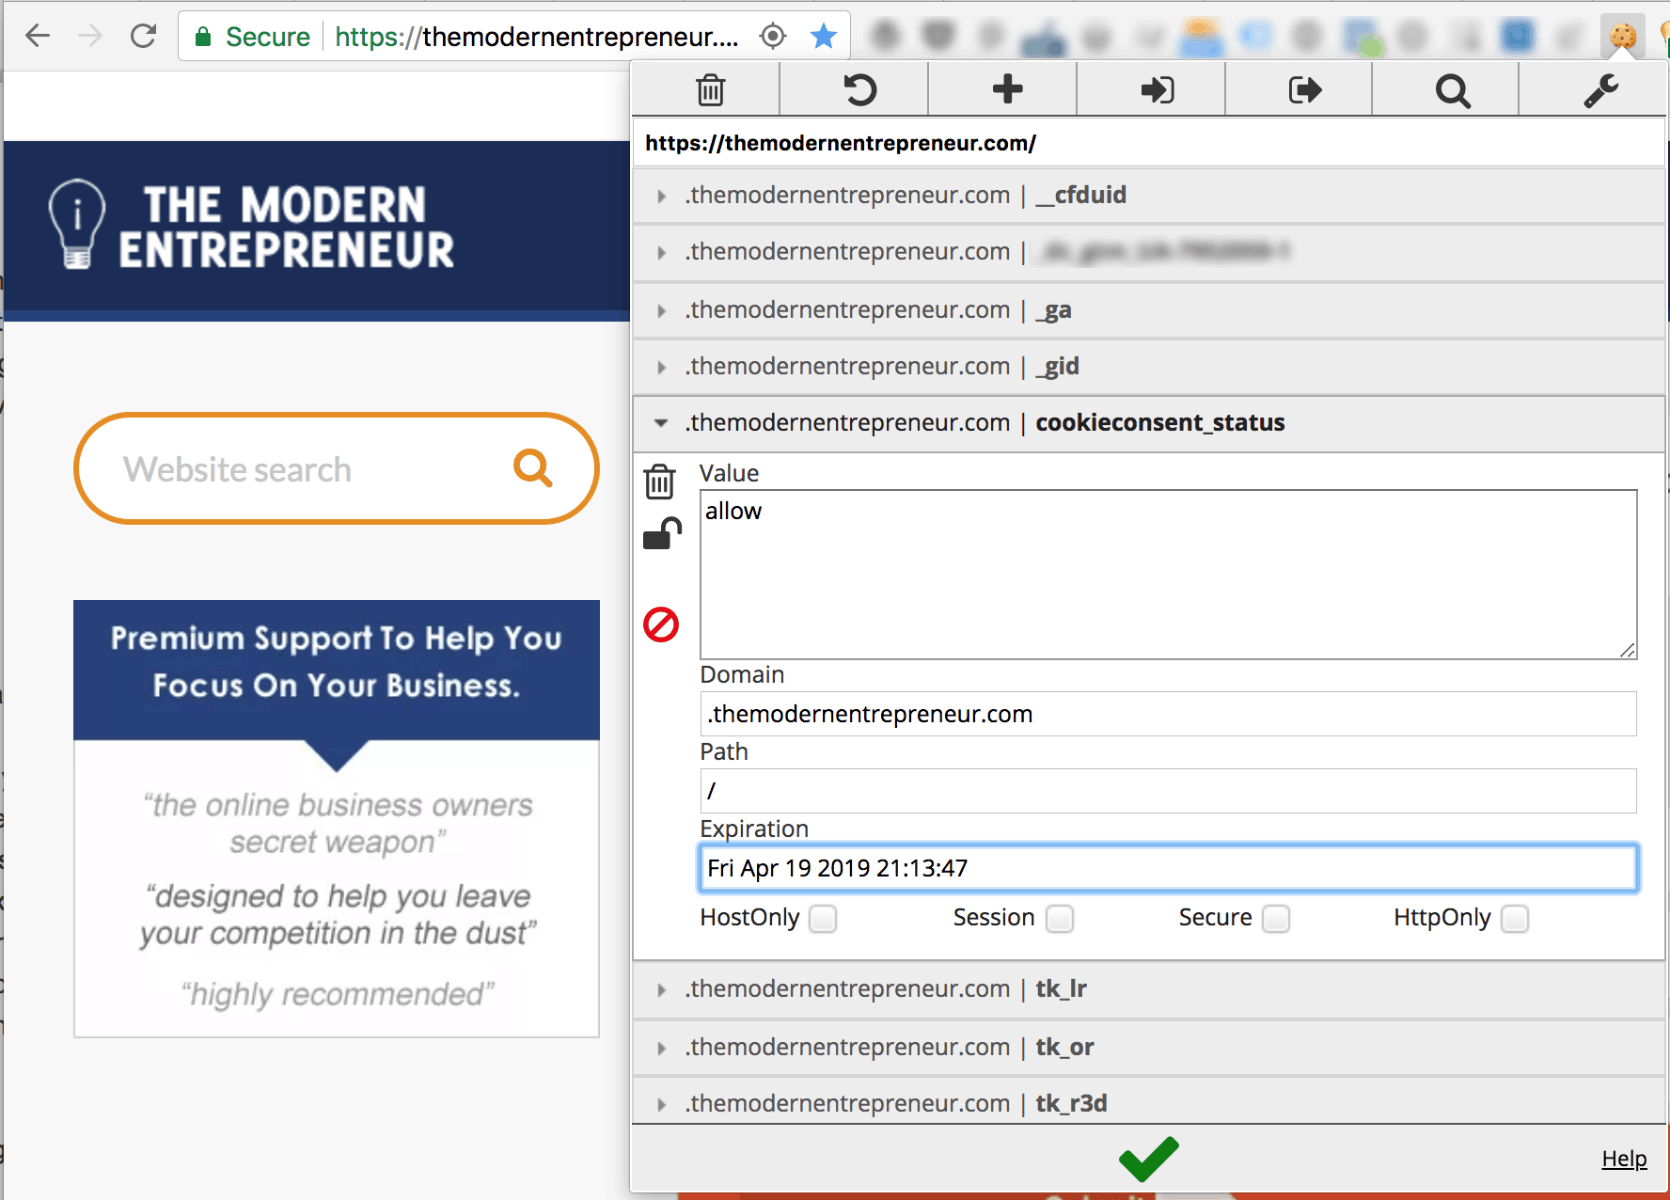
As cookies are not typically user facing, they can sometimes have very cryptic names. For most common cookies you should be able to Google the name shown in bold and discover what tool is creating them. If you get stuck then you may need to ask a developer to help you identify the source.
Delete: Stop Holding (and Collecting) Unnecessary Data
Once you are clear about what data is being collected, processed, and stored, you should create a plan for removing any unnecessary data collection. This would include deleting any user data that you aren't required to hold by law that isn't being used by your organisation. Many businesses find themselves collecting data just in case they decide to use it at some stage. If you can think of anything you are collecting “just in case”, this is the perfect opportunity to drop the data and stop collecting it. You might even find this will save costs by holding less user records or using less server space.
This stage of the process isn't limited just to user data you hold… If you have identified any tools that are collecting data from your users without providing any quantifiable benefit to your organisation, then you should probably delete those too. For example; do you really need that social media widget for a social network that you haven't been using for months? The less data you collect and control unnecessarily, the better. By respecting your users privacy you lower the attack surface and insulate your website against potentially costly data leaks and breaches of trust.
Minimise: Creating Privacy Respecting Forms
Web forms, and contact forms especially, are one of the most common ways that you will collect clearly personal information such as; names, emails, phone numbers, and often this will be linked with an IP address. Chances are you will need some contact information to reply to people that reach out to you through a form, but you can still take steps to minimise the data. For example; do you really need to collect a phone number if you only offer email support?
Another common case of over-collection with many WordPress form plugins such as Gravity Forms are that they collect IP addresses by default. While there may be some cases where this information is useful, for the majority of site owners it makes more sense to simply stop collecting IP addresses. It may not be possible to anonymise your contact form data, but if you are not using actively using the IP address why risk holding it? Luckily Gravity Forms have planned for this possibility and in our case it we just needed to add this code snippet to our website.
This file contains hidden or bidirectional Unicode text that may be interpreted or compiled differently than what appears below. To review, open the file in an editor that reveals hidden Unicode characters.
Learn more about bidirectional Unicode characters
| <?php | |
| /* Prevent IP address from being stored by Gravity Forms to assist with GDPR compliance */ | |
| add_filter( 'gform_ip_address', '__return_empty_string' ); |
This is a great start but if your form collects lots of highly sensitive data anyway it may not be enough.
By default Gravity Forms sends all contacts to your email and also stores a copy in your websites database. Another step that you could take is minimising the amount of data you store directly on your server. You could use a plugin to ensure that contacts are only sent via email so that the information remains protected if your site were ever to get hacked.
Also Consent & Education: Informed Consent to Usage of Form Data
Ensuring your forms only collect and store the information you need is important but it is only one part of the equation. You still need to ensure that end users understand what information you are collecting, what you will do with it, and any measures you have in place to protect that information. This is especially important in the case that you are using a form to collect personal details for email marketing processed by a third party such as ActiveCampaign or MailChimp.
If you are not already collecting an explicit opt-in preference, you will want to ensure that you include an optin checkbox that is not checked by default with a label saying something like: “I would like to opt-in for email marketing updates in accordance with the privacy policy”. This makes sure that users take action by checking the box to provide consent and it protects you as you have a record of consent. As long as you provide all necessary disclaimers and notices of third parties within the linked privacy policy it also contributes to educating your users and creating informed consent.
Anonymise: Google Analytics Anonymisation
It is speculated that analytics may exempted in a future revision of this law, but even without this compromise you can anonymise the data you collect through Google Analytics specifically. There is an optional plugin for Google Analytics called anonymizeIp. If you enable this feature then the IP address of a user which could be considered as personally identifying information under GDPR is masked.
Google explains this feature as such:
“the last octet of the user IP address is set to zero while still in memory. For example, an IP address of 12.214.31.144 would be changed to 12.214.31.0. (If the IP address is an IPv6 address, the last 80 of the 128 bits are set to zero.) Only after this anonymization process is the request written to disk for processing. If the IP anonymization method is used, then at no time is the full IP address written to disk as all anonymization happens in memory nearly instantaneously after the request has been received.”
If you have installed your analytics through Google Tag Manager as we recommend, make sure are using the Universal Analytics tag and enable the anonymizeIp option on all of your Google Analytics Universal Analytics tags. You can do this under More Settings > Fields to set with the Field Name set as anonymizeIP and the Field Value set to true.

One thing to consider is that even with the above steps it is possible that you still may be inadvertently including personally identifiable information in your analytics. For example if users register on your website and visit a URL that contains their membership ID or place orders that include transaction IDs these could potentially be used to identify them and as such you may still want to delay Google Analytics firing until you have received specific consent.
Collecting Consent: Cookie Consent for GDPR Compliance via Google Tag Manager
The next step to take is implementing some control over when tracking cookies are fired. For the purpose of this guide we will be using Google Tag Manager Triggers to fire all of our marketing and tracking tags. One example of a tag that uses non-essential tracking cookies is the Facebook Pixel used for building custom advertising audiences. Usually you would add the Facebook Pixel code to your website directly or place it inside GTM as a tag that fires on All Pages. However the standard method offers no way to gain consent from the user before Facebook starts collecting data. Instead we need a way to fire marketing tags only once a user has provided explicit consent.
Getting Consent for Advanced Marketing Tags
The first thing you need to do is set up a notification that collects consent to receive marketing tags. You can do this by presenting a popup based on the slightly older cookie consent laws. If they Decline, their preference will be stored in an essential cookie to disable the notification. However if they Accept it will set a cookie consenting to marketing tags which you can use as part of of your Triggers aka firing rules inside Google Tag Manager.
While a WordPress plugin like Cookie Consent by dFactory seems like the obvious choice for a WordPress site, it actually makes more sense to implement a solution through Google Tag Manager. The reason for this is because WordPress plugins are more likely to be updated and if the targeted element IDs inside the plugin change your solution could break. This could put you at risk of breaching GDPR regulations without noticing the change had even taken place. Another thing that came up during initial testing is that WordPress plugin cookie consent solutions were being affected by caching so not all users were being presented with the consent notifications as expected.
Ultimately the decision was made to use a script called Cookie Consent by Insites that you can easily inject through directly through GTM. One thing I did notice whilst testing this solution is that the script is picked up by some ad blockers, perhaps as it has GeoIP elements in it. Ultimately this likely isn’t a problem as anyone that has actively installed an ad-blocker is unlikely to provide consent and receive your full set of marketing tags anyway.
Setting up Cookie Consent by Insites
The easiest way to get started with Cookie Consent is by following the wizard on the official website. There are several design options and you can customise the wording to match your specific use case. One point of consideration when crafting your custom text for the consent is that you need to be specific about the intent of your data collection, methodology, and duration of consent.
Here is the text used in our initial tests but please consult a legal professional for exactly what is required:
“This website respects your privacy by adhering to international regulations. We may use your personal data for analytics, testing, personalisation, conversion tracking, marketing automation, remarketing, and advertising for as long as you consent in line with our policies. We never sell your data.”
As we are aiming for full GDPR compliance, the most important setting is the compliance type. You will need to select “Ask users to opt into cookies (Advanced)”. As the name suggests there is a little bit more work to do once you have finished using the wizard.
An example configuration is provided in the snippet below, but please bare in mind you will need to update your domain, colours, and messaging if you use this so it may be easier to use the official Cookie Consent Wizard to create your own script.
Example Cookie Consent Configuration
You should copy the code that is provided and create a new Custom HTML Tag inside of Google Tag Manager that is set to fire on all pages. This will make sure that all of your users are presented the option to accept cookies or not. This lays the foundation of the full consent solution but it won’t prevent your marketing tags from firing on it’s own.
One side note is that the script provided by the wizard loads some assets via the Cloudflare CDN. The URL contains a version number so it is unlikely your code will break due to changes in the script, however for increased security and assurance you can host the two required Javascript and CSS files on your own server. You can find both files on GitHub here, upload them anywhere on your server, and replace the links in the snippet with the full URL of the files on your servers. This is certainly not a required step but could give advanced users extra piece of mind.
Linking Cookie Consent to Triggers in Google Tag Manager
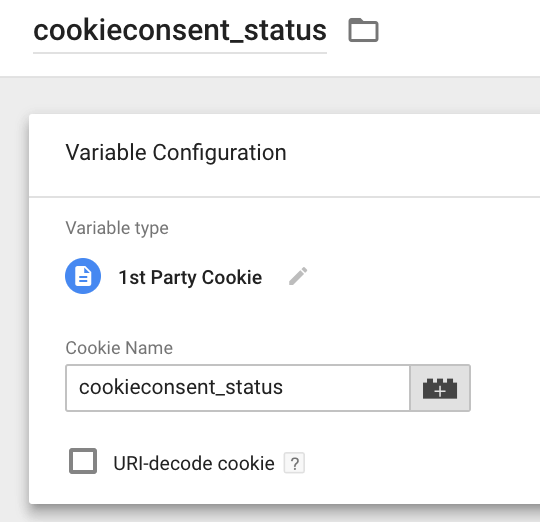
To access the users decision inside in your Triggers you will need to link the cookie inside Google Tag Manager. To do this you should configure a new 1st Party Cookie Variable inside GTM with the Cookie Name set to cookieconsent_status. This will store the decision that a user has made and can now be used within your triggers.
As an example of how you might set up a Facebook Pixel that was previously firing on All Pages; you can create a new Trigger called All Pages – Cookies Accepted Under the configuration options you would select Page View as the Trigger type and have it set to fire on Some Page Views. The additional logic that makes sure a user has consented would be as follows:
- Variable: url – Matching Rule: matchesRegEx – Value: .*
- Variable: cookieconsent_status – Matching Rule: equals – Value: allow
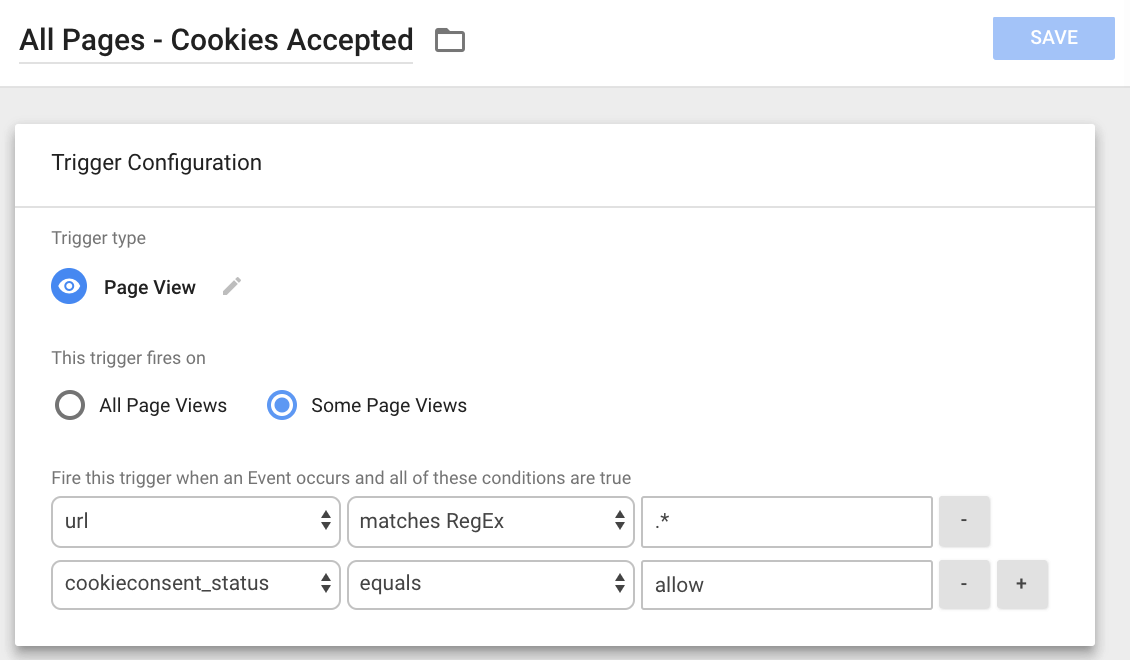
The first filter confirms that this Trigger should impact all pages and the second filter states that it should only apply on these pages if the user has the cookie showing they have provided consent through our Cookie Consent dialogue.
Now some of you that have been following along will see there is still a potential flaw in this logic. As the trigger is fired during a page view it won’t fire on the page that the cookie is accepted on by default. For this to happen we need to set up a second Trigger that is fired at exact the moment the user provides consent. There are several ways you could do this but to keep things as simple as possible we are going to set up a new Trigger of the Click – Just Links type which we will call Click – Cookies Accepted. It should be set to fire for Some Link Clicks with the following filter:
- Variable: element classes – Matching Rule: contains – Value: cc-allow
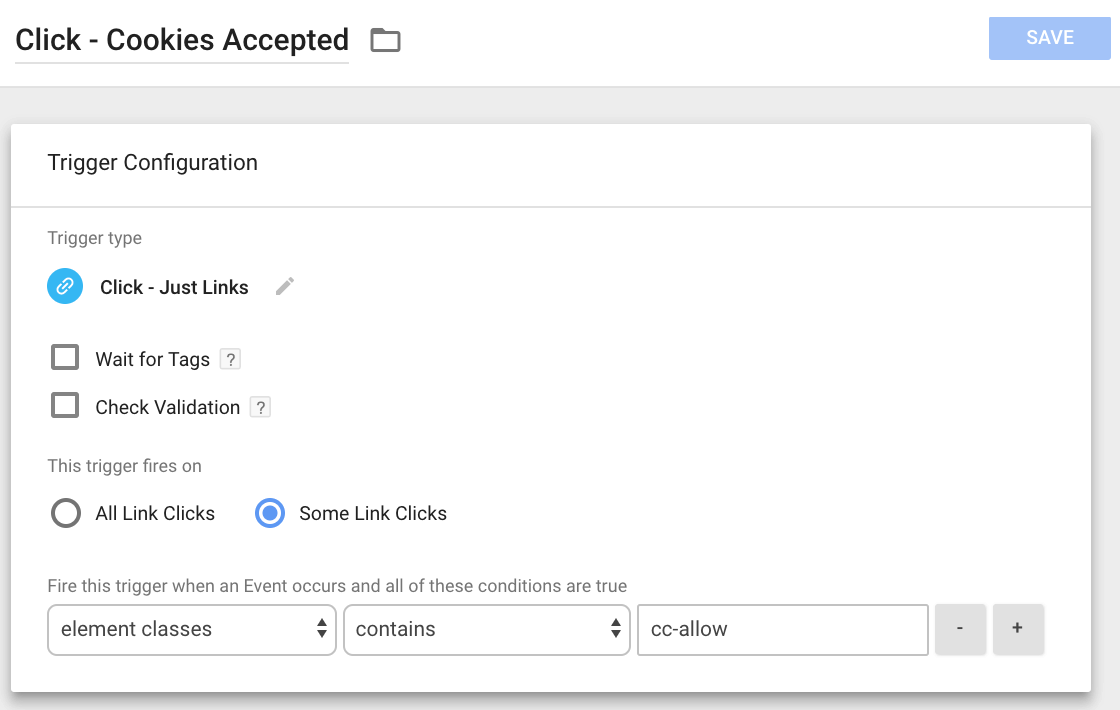
This targeting matches the acceptance link in our initial Cooke Consent script and should fire immediately when somebody provides consent.
At this stage you have set up one Tag that injects the initial Cookie Consent dialogue on All Pages so people can set their preferences, you have one Variable that contains a users Cookie Consent preference and two separate Triggers that will only fire if somebody has provided consent for marketing cookies. These two triggers can be added to any marketing tags inside Google Tag Manager that you would like to load only after consent has been provided. You should also be able to use the above examples to create custom triggers by using standard targeting as long as you ensure to include a filter confirming that the cookieconsent_status value is always equal to allow.
Bonus Tip: Tracking Cookie Consent trends in Google Analytics
Assuming that you have set up Google Analytics with IP Anonymisation in the first part of this article, you can also set up anonymised tracking of cookie consent. This will allow you to monitor trends in relation to how many people are accepting and or disabling your advanced marketing cookies.
To do this you set up a new Universal Analytics Tag which we’ll call GA – Event – Cookie Consent. The Track Type should be set to Event with an appropriate Category such as Cookie Consent and the Action set to the variable {{cookieconsent_status}}.
The above tag will need a Trigger of the Click – Just Links type. It should only fire on Some Link Clicks filtered by the following details:
- Variable: element classes – Matching Rule: contains – Value: cc-allow

This will then register a Cookie Consent event in Google Analytics whenever a user interacts with your dialogue along with the specific action that was taken; either allow or dismiss. This should also assist in creating an audit trial for explicit consent. More advanced usage might link these events and their pseudononymous Google Analytics IDs against users in your internal databases however this would likely make your analytics records fall under the category of potential PII so you would need explicit consent for loading even the anonymised analytics script.
Revoking Cookie Consent
Now that you’ve got consent for including marketing and tracking tags on your page you are well on your way to compliance. But for complete consent compliance you also need to provide a way for users to revoke their consent and opt out. With the script we installed above there are two main methods. If you included the revokable setting as in our example script then a user can hover over the cookie policy tab on your page and decline consent. This will change the status inside the previously set cookie linked to the variable in GTM and your advanced marketing tags will no longer be added to the page.
What the above setting won’t do is clear the users cookies or delete their data from any linked marketing platforms. Therefore it is important that you include instructions on removing cookies in your legal policies and also provide full instructions for opting out of their data being stored by your organisation and marketing partners where possible.
Educate: Update Your Legal Policies & User Experience (UX)
The last step of AD-MACE process is to ensure that you are doing enough to educate your users. A good place to start is by updating your privacy policies to communicate your data processing and partners more clearly. The UK ICO offer some information on what you should cover. When updating your legal policies you might look towards the open source legal documents from WordPress which you are free to re-use and adjust to match your websites stance.
The GDPR is not like previous regulations where including general privacy information in your policies was enough. Although this piece is still essential you need to go further by including prominent links to it at key moments such as form submissions and when a user provides consent to various types of data collection. Where a user provides consent, you should be creating clear expectations about exactly what is going to happen with that data and how they can manage consent.
Further WordPress GDPR Considerations
This article covered our AD-MACE process and some examples of the steps you can take to layer GDPR compliance onto WordPress, however they do not address WordPress functionality as its core. There are many projects focusing on the different ways to comply with the Right to Access, Right to Be Forgotten and Data Portability.
An aptly named project called GDPR WP set out to standardise the way WordPress plugins manage personal data and it's efforts are now being worked into WordPress core for future release. Together these projects will ensure that functionality baked into WordPress itself is compliant with the key features of GDPR and it should also enable website owners to more easily exercise control over user data and respond to user informationl access, deletion, and portability requests.
Notable WordPress GDPR Efforts To Follow
- Automattic (WordPress.com) and the GDPR
- GDPR for WordPress – An Industry Standard Across Plugins
- Jetpack GDPR Compliance
- WooCommerce GDPR Compliance
Final Notes
The GDPR is a complex price of legislation that will have far reaching consequences for business around the world. It could go through several revisions and specific guidance may change over time. At its core it is about respecting the data your users provide. Whether you use the specific methods in this article or not, as long as you follow a good process and keep the best interests of your users in mind, you should well be on your way to doing the right thing.
Acknowledgements
The information and guidelines within this post are based on countless hours of both primary and secondary research. There is no way I could credit everyone that has influenced this approach or the example techniques within. With that said I would like to say a special thanks to; AnalyticsMania.com, BlastAM.com. SimoAhava.com, the GTM team, and Insites.com for online technical and legal contributions that have helped inform this direction.